
Find the Moles Level Solutions (Levels 1–3)
These are the solutions for the first three Find the Moles levels, the 5×5 fields that teach the game. I played each one and cleared it with no mistakes using exactly the digs below. Every step is explained, so you can use the same logic on later boards instead of only copying the answer.
How to read the grids: rows are numbered 1–5 from the top and columns 1–5 from the left, so R3C4 means row 3, column 4. Signs are shown as arrow + number (←2 = "2 moles to the left"). 🐹 marks a mole, · an empty cell.
Level 1 Solution (Easy, 4 moles)
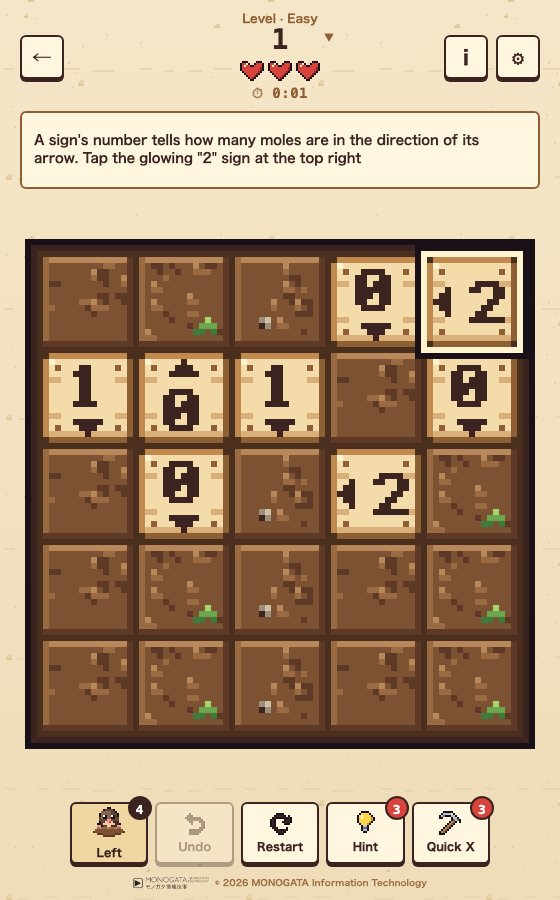
| C1 | C2 | C3 | C4 | C5 | |
|---|---|---|---|---|---|
| R1 | 🐹 | · | 🐹 | 0↓ | ←2 |
| R2 | 1↓ | 0↑ | 1↓ | · | 0↓ |
| R3 | 🐹 | 0↓ | 🐹 | ←2 | · |
| R4 | · | · | · | · | · |
| R5 | · | · | · | · | · |
Moles: R1C1, R1C3, R3C1, R3C3.
- The ←2 at R1C5 looks left over R1C4 (a sign) to R1C1–R1C3. The 0↑ at R2C2 clears R1C2, so the two moles must be R1C1 and R1C3.
- The ←2 at R3C4 covers only R3C3 and R3C1 (R3C2 is a sign). Two moles in two cells: dig both.
- Check: the 0↓ signs empty column 4 and column 5 below them, and the 1↓ signs in row 2 are each satisfied by the moles in row 3.
Level 2 Solution (Easy, 4 moles)
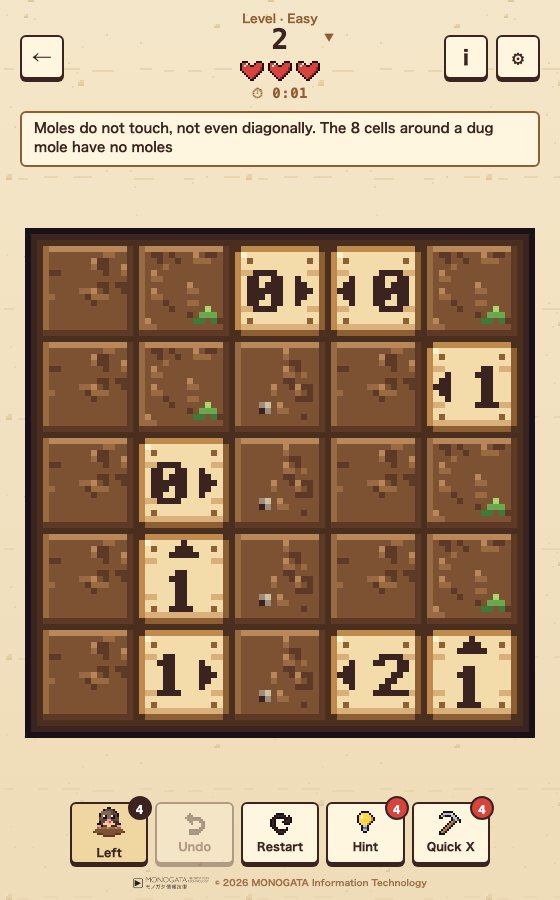
| C1 | C2 | C3 | C4 | C5 | |
|---|---|---|---|---|---|
| R1 | · | · | 0→ | ←0 | · |
| R2 | · | 🐹 | · | · | ←1 |
| R3 | · | 0→ | · | · | · |
| R4 | · | 1↑ | · | · | 🐹 |
| R5 | 🐹 | 1→ | 🐹 | ←2 | 1↑ |
Moles: R2C2, R4C5, R5C1, R5C3.
- Mark X past both 0 signs: R1C1, R1C2, R1C5 and R3C3–R3C5.
- The 1↑ at R4C2 looks up past the R3C2 sign to R2C2 and R1C2. R1C2 is already X, so R2C2 is a mole. That also satisfies the ←1 at R2C5.
- The 1→ at R5C2 has only R5C3 before the signs, so R5C3 is a mole. The ←2 at R5C4 then needs R5C1 as well.
- The 1↑ at R5C5 covers R4C5, R3C5 and R1C5. Only R4C5 is still open, so dig it.
Level 3 Solution (Normal, 4 moles)
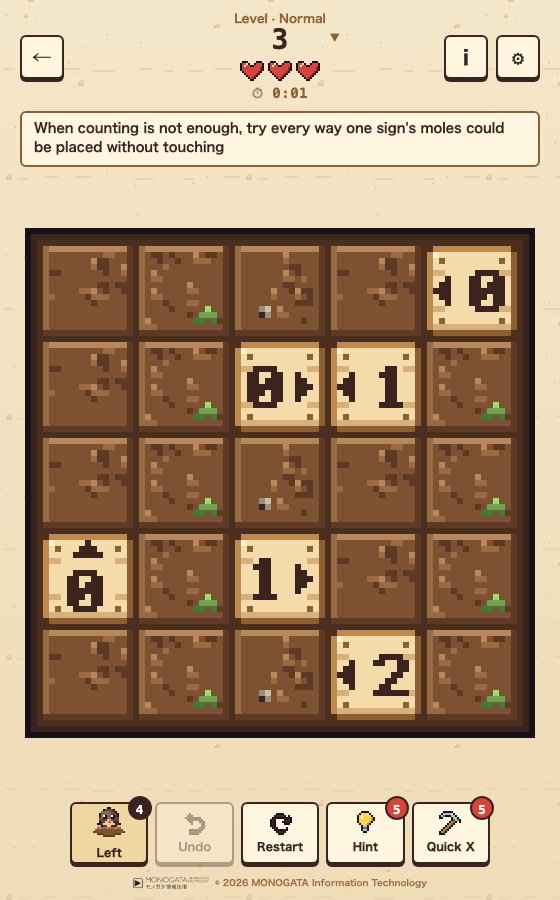
| C1 | C2 | C3 | C4 | C5 | |
|---|---|---|---|---|---|
| R1 | · | · | · | · | ←0 |
| R2 | · | 🐹 | 0→ | ←1 | · |
| R3 | · | · | · | · | · |
| R4 | 0↑ | · | 1→ | · | 🐹 |
| R5 | 🐹 | · | 🐹 | ←2 | · |
Moles: R2C2, R4C5, R5C1, R5C3.
Level 3 is the first board where counting alone is not enough. The in-game tip says it well: try every way one sign's moles could be placed without touching.
- Clear the zeros: the ←0 empties row 1, the 0→ empties R2C5, and the 0↑ at R4C1 empties R3C1 and R2C1.
- The ←1 at R2C4 now has only R2C2 left. Dig it.
- The ←2 at R5C4 covers R5C1–R5C3. Two moles in three cells that cannot touch means the ends: R5C1 and R5C3.
- The 1→ at R4C3 picks R4C4 or R4C5. R4C4 touches R5C3 diagonally, so the mole is R4C5.
Clearing level 3 with no mistakes earns your third star and unlocks the first outfit, the Hard hat (see Find the Moles outfits).
Stuck on a Later Level?
Later Find the Moles fields are generated, so this page cannot list every answer. Use the patterns on the tips and strategy page, and remember the Hint button always shows a move that is certain. For the shared daily board, see Daily Puzzle.